Favourites
Sign in to your account
By adding to Favourites, you can…
- Save products or resource documents you view regularly
- Save time with quick access to frequently viewed items
Please sign in or create an account to add to your Favourites.


At Bromic we assess water quality using the Langelier Saturation Index (LSI). At operating temperature, normal balanced water falls between –0.3 and +0.3, while harsh water falls outside that band but still within warranty limits (≥ −1.0 and ≤ +0.8). Harsh water increases the risk of scale and corrosion and may require more frequent servicing.
See our complete guide for details on LSI, warranty considerations and maintenance recommendations.
If you’re in a harsh water area, installing an auxiliary filter and increasing your servicing frequency can help protect your unit. You should also regularly check for residue or debris on components like the inlet strainer. If you’re unsure about local water quality, contact your state water authority or local council.
For practical tips on protecting your dispenser in harsh water conditions, see our complete guide.
Proper water quality protects the internal components of the boiler – especially the heating element, water level probes and inlet filter. Poor water quality can cause scale, corrosion and fouling, which lead to slow heat up times, increased energy use and premature component wear.
To understand how water quality affects performance and lifespan, read our comprehensive guide.
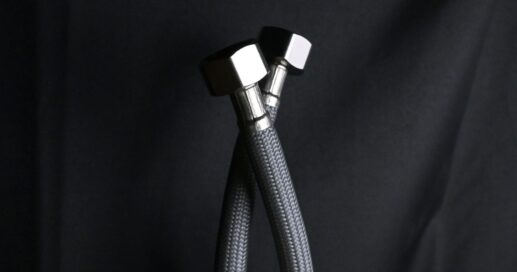
Our PEX core hoses feature a durable inner layer designed to resist bursting, backed by a 10-year warranty.
PEX PRO hoses offer the same burst-resistant core, but with the added benefit of a SS316 stainless steel braid, providing enhanced rust resistance and a 15-year warranty.
All our water hoses are lead-free, in line with ABCB and NCC regulations requiring lead-free water hoses by May 2026.
Yes. The HF-318 and HF-327 3-Phase Instantaneous Electric Water units used in this project can be configured to meet a wide range of hot water demands in a variety of developments, including multi-dwelling and commercial buildings, as well as any applications requiring consistent, efficient hot water supply.
Without central storage tanks, there is no risk of Legionella growth, corrosion, or sediment build-up. There is also no need for ongoing monitoring. Individual units can be serviced or replaced without interrupting hot water supply to other parts of the building.
For example, the units installed in the Woodlands WA project were WaterMarked to AS/NZS 3498 and installed in accordance with AS/NZS 3500. Each unit features electronic temperature control pre-set to 50°C, meeting safety requirements without requiring a separate tempering valve.
By heating water only when needed, Bromic 3-Phase Instantaneous water heaters eliminate standby losses and reduce wasted cold water. This results in lower energy consumption and reduced running costs for the building.
Yes. Electrical diversity is used when multiple 3-phase EHW units are installed on the same project. Since not all hot water units operate at once, this allows for more accurate electrical load calculations and can significantly reduce the size and cost of wiring, cabling and switchboards.
Adjusting a Bromic gas regulator ensures that gas-powered appliances receive the correct pressure for optimal performance. The process varies depending on the type of regulator (LPG, natural gas, single-stage, or dual-stage), but the general steps are similar.
1. Identify the Adjustment Screw
Locate the pressure adjustment screw on the regulator (typically covered by a plastic cap that needs to be unscrewed). Some Bromic regulators use spring-loaded mechanisms to control gas flow.
2. Turn On Gas & Test Appliance
Slowly open the gas supply and ignite the appliance.
Observe the flame pattern and appliance performance. A steady blue flame indicates proper adjustment.
3. Make Small Adjustments
While the appliance/s are running, measure the dynamic pressure and adjust as required.
Increase Pressure: Turn the screw clockwise (+) to allow more gas flow.
Decrease Pressure: Turn the screw counterclockwise (-) to reduce gas flow.
Adjust in ¼-turn increments, checking the pressure gauge after each adjustment.
5. Check for Gas Leaks
Mix soapy water or a leak detector such as LA-CO Visu-glow Fluorescent Leak and apply it to the regulator connections. If bubbles form, there is a leak – tighten connections or replace seals.
6. Secure the Adjustment & Monitor
Once the correct pressure is set, replace the adjustment cap (if applicable). Monitor the appliance over time to ensure consistent performance.

STILL HAVE QUESTIONS?
If you have searched our website, document library & FAQs and haven’t found the information you need, please contact us to resolve your query. This will allow us to continually improve the data we share here and elsewhere on our website.
Featured Articles
Explore our comprehensive articles and blogs on plumbing and gas products to stay updated with trends, tips, and industry insights. Discover valuable product information that will help you make informed decisions for your next plumbing and gas purchase.